
Clip studio paint allows you to draw various lights and shadows in 3 minutes! Time-saving and beautiful drawing techniques!
- Comic Black Rainbow
- 4 days ago
- 7 min read
Updated: 2 days ago

Hello! Little cutie
I am Comic Black Rainbow.
At first, I was afraid that I would not be able to get used to the new software.
It may take time to adapt.
So I've been thinking about waiting until I have time to study it.
In the end, the wait is endless.
A year has passed just like that!!!
Until recently, I started using Clip studio paint to draw.
The result is an amazing painting!
It's quite useful!
It's not what I thought it would take time to adapt to.
At least it’s easier to use than Procreate XDDDD
(Don’t refute me! I spent a lot of time to figure out the Procreate brush settings)
It just so happens that recently Clip studio tips will have some themes.
I'm going to do a tutorial using Clip studio paint!
Let's use just one trick - layer modes!
In just 3 minutes, you can draw a variety of light and shadow effects!
For those who find light and shadow difficult to draw, or those who draw by hand, this digital painting function is a great blessing.
Plus, this painting method is not complicated, super simple.
There is no need to do any complicated coloring and drawing of light and shadow.
In the beginning, you can simply draw a character.
Then simply paint it with its inherent color.

After preparing this picture, next, I will use this picture, simple layer mode techniques to demonstrate three different light and shadow effects.
So let's take a look!
Let's see how we can use this trick to create various light and shadow effects!
Further reading you might find interesting:
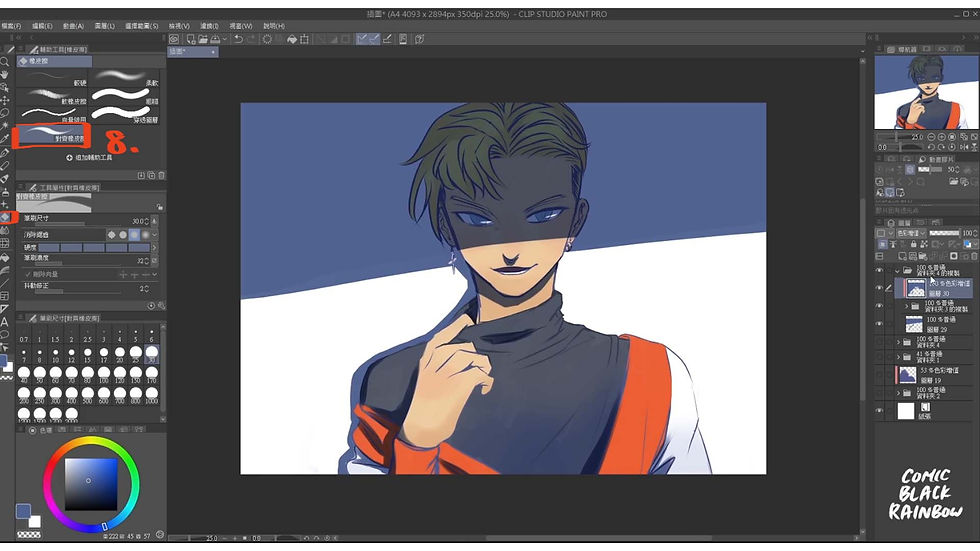
1. Backlight

First, we open a layer. This layer is where we will draw the shadow, so we first change the layer mode of this layer to [Color Multiplication] and then select the shadow color we want. Here I choose low-saturation blue instead of gray because this will not make the shadow look too dark. Next, just use the paint bucket to cover the entire layer with color!

Then click on the "Clip with next layer" effect for this shadow layer (this will make the shadow color appear only where the character layer appears below) and the "Create layer mask" effect (which makes it convenient for us to modify the erased area at any time).

Then we can start to erase the shadows around the character with an eraser. Here I started with a fuzzier brush to roughly erase the shadows around the character, and then used a sharper brush to make some detailed modifications. In fact, after doing this, there is a bit of a backlit feeling!
Note: Remember to click on the all-white mask on the right side of the shadow layer when erasing! This way you won't accidentally erase the shadow itself, which would be difficult to modify later.

Next, we add another layer. This time we will use it to draw the backlight halo around the character, so set the layer mode to [Real Light], choose the color of the light we want to draw as a warmer yellow, then select the brush tool, and use a fuzzier brush to draw some halo around the character, and the backlight shadow is done!

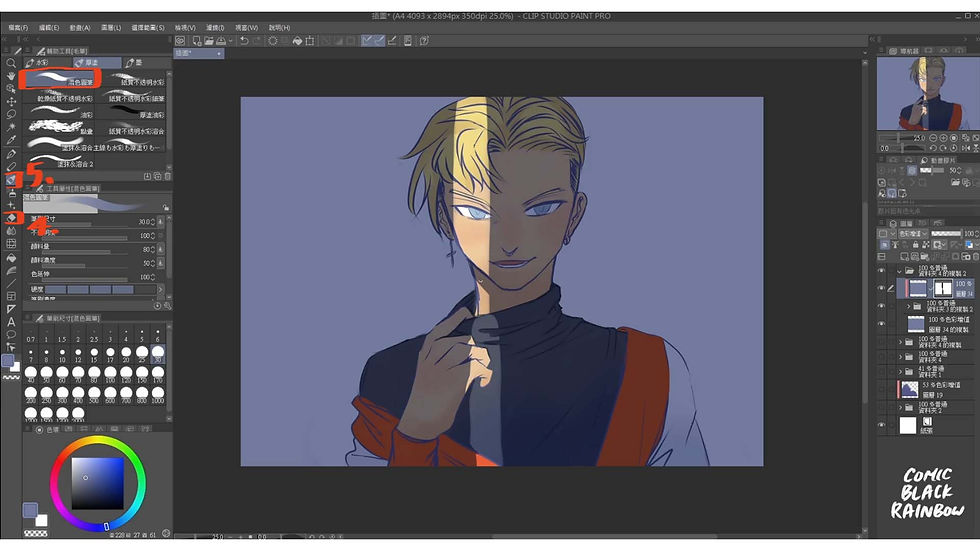
2. Two-part light and shadow

First, we now open a new layer below the character's layer, select the shadow color, and then use the paint bucket + brush tool to draw the background shadow we want. Here I use the two-part method to draw the shadow effect because the two-part shadow is a simple, rough, and beautiful light and shadow painting method!

Next, we add a shadow layer above the character layer. This shadow layer is mainly the shadow on the character, so select [Color Increase] as well, and click on the "Clip with next layer" layer effect, and then use the paint bucket to fill in color directly on the character.

Then we use an eraser to erase the shadows in the areas under the entire character illuminated by light, leaving only the shadows under the nose and chin.

It would be too monotonous if the entire shadow was erased, so here I am using the brush tool and choosing a sharper brush to paint some shadows on the clothes and hands.

To make the character's eyes sharper, I simply used an eraser to draw some light reflections in the character's eyes to make them look more lively.
Then, create another new layer below the background shadow, select a warmer yellow, and fill the layer directly with the paint bucket.

Because I want to make the color and atmosphere here a little warmer, and even contrast it with the blue shadow, I chose a pinker color, used the brush tool, chose a fuzzier brush, and painted some pink on the same layer.

In addition to the pink background, the characters will be affected by the sunlight, so I added a new layer on the top layer, selected the [Real Light] layer mode, lowered the opacity, and used the brush and color just now to simply paint on the character.

Because I want this pink ambient light to only affect the character, I turn on the "Clip with Next Layer" layer effect for this layer again and adjust the opacity to make the picture more natural.

Next, I wanted to make the reflection of the eyes more prominent, so I added another layer on top, used the [Overlay] layer mode, selected a yellowish color, and used a fuzzier brush in the brush tool to lightly paint on the reflection of the eyes. But at this point, I felt it was a bit too abrupt!

So in the end I changed the layer mode to [Soft Light] and adjusted the desaturation to 50, and it felt more natural! Then the method of drawing binary light and shadow is completed!

3. Door light and shadow

At the very beginning, we add a shadow layer above the character layer, select [Color Increase], select the shadow color you want to use, and fill it directly with the paint bucket.

Then copy this shadow layer and place it above the character layer, and click on the layer effects of "Crop with next layer" and "Create layer mask". Remember to click on the all-white mask on the right side of this layer.

At this time, we use the eraser to directly draw the part of the door light on this mask, and then use the brush tool to draw shadows on the parts within the range of the door light that may appear.
Next, we open a new layer on the top, select [Real Light], click on the "Clip with next layer" effect, lower the opacity to about 40, select the light color we want, and then use the brush tool, select the blur brush, and draw a little halo around the door gap. But at first, I felt that the halo was a bit too big and not natural, so I used an eraser to do some erasing and modification later.

Then, after the overall painting was almost done, I felt that the background was not dark enough, so I chose a darker gray-blue color and filled the background layer directly with a paint bucket to contrast light and dark strongly.

At this time, my old habit comes back and I always want to add some details 😆 so I hide the halo layer first, and above the character layer, in the mask of the shadow layer, I use a brush to increase the shadow under the character's eyebrows and hair in the area illuminating the character.

Then use an eraser to apply some reflection on the eyes of the person in the shadow, which can also make the person's eyes look more lively.

Finally, I added another layer on top of the layers, selected white, used the brush tool, and used a sharper brush to paint some eye reflections on the eye that was illuminated by the crack in the door.

Turn on the Halo layer of the door light, and you're done!

After watching the tutorial, do you feel it is amazing only takes one or two minutes to draw light and shadow?
For those who always think that drawing is difficult and takes a long time, I hope today's teaching can help you learn time-saving and good-looking digital painting techniques!
Of course, the most important thing is you must practice drawing after finishing the tutorial so that you can learn it!
If you encounter any problems or difficulties during practice, welcome to private message me 😃😃
I'm very happy to see that you have read this Clip studio paint digital painting tutorial! I'm excited to do this tutorial! Who doesn't want to know simple techniques to draw good paintings? So when I found out that drawing like this is really simple, convenient, and fast, I couldn't help but make this tutorial! I hope you can follow along and create some great artwork using the techniques you learned today!
Of course, there is a lot of knowledge and principles involved in drawing. If you can learn them and apply them in digital drawing, you will be even more powerful! Of course, if you want to learn more about the knowledge and skills of learning digital painting, you can come and participate in this 60-minute free course! Come learn more secrets of learning digital painting! If you want to learn more about digital painting tutorials and information, you are welcome to subscribe to my website's blog newsletter, so you can learn for free! If anything you want to learn, or want to know about digital painting or drawing, you are welcome to leave a comment below, or share your questions with me via social media or email! I hope you can quickly apply the digital painting techniques you learned today to help your paintings create more different light and shadow effects!

Comments